Sunday, December 18, 2011

How to Send Photos from iPhone with Return Receipt

Answer: use the free EmailLargeFile iPhone app.

What are the advantages? Our iPhone app is free, it sends full-resolution photos as opposed to sending them via text messaging, and it will notify you when your recipient opens the file.

Here is how to use it.

1. Download the 'EMail Large File' app.

2. Go to your iPhone Settings, select 'EMail Large File' in the list.
Enter an e-mail address you want to use for return receipts. We often call them delivery notifications. It's because they are sent once your recipient opens or downloads the file you sent them. Those messages are only sent once per submission, so don't worry about getting multiple e-mails.

3. Launch the EMail Large File app.

Tap on [Photo Library], and select a photo from your iPhone gallery.


Next, tap on [EMail to:] to select a recipient address.
Alternatively, you can type the e-mail address manually if you don't have it in your address book.

Finally, tap on [Send] to upload and send the file.


4. After a few seconds or minutes, depending how fast your internet connection is (we recommend using WiFi) you will see the "success" message.


At this point, your file is on our server, and your buddy is sent an EmailLargeFile.com link to the file.

The link will be active for 7 days. If your recipient views the photo before the link expires, we will send you the delivery confirmation to the e-mail address you entered in step #2.

Important: please be aware that depending on your mobile plan your provider (including AT&T or Verizon) may charge you extra for transferring files or data. That's why we recommend using WiFi whenever possible for browsing Internet or using file transfer services such as EmailLargeFile.com.


Monday, December 5, 2011

How to Set Up EmailLargeFile Dropbox

Hi,
in one of my earlier posts I explained how to use the EmailLargeFile dropbox. Let's see how you can set it up and configure.

First, login to EmailLargeFile account. Go to Account Settings.

After you click the Enable dropbox option, a frame with the configuration settings will unfold.


Enter Title and Description. That's what the users will see.
It's a good idea to use your name in the Dropbox title, and to put an extended message for users in the Description. They have to know that they won't be allowed to send files to you until you add them to your Emaillargefile address book.

Html is allowed in the Description field.

This is how your users will see the dropbox:


Now, the number of files per e-mail is essentially a restriction imposed on how many files a user can upload to you. Keeping it at 5 might be a good idea.


Now, it's good to know that the following limitations are true for dropboxes:
- dropbox cannot be bigger than 8Gb for Professional accounts or any accounts under 24Gb of total space allotment,
- it cannot be bigger than 2Gb for Personal accounts or any accounts with total space allotment of 8Gb or less (if enabled).


Sunday, November 27, 2011

How to Transfer Files from Android Phone via EmailLargeFile.NET

Hi,
Let's say you are a real estate agent, or an appraiser making pictures of a property. We have good news for you. We have an Android phone app that can help you transfer photos or movie flicks to your EmailLargeFile.Net account. Then, you can easily send your files to your office or to your clients.

Here is how it works.

1. Device and Account Setup.


First, you need to setup your device to work with your EmailLargeFile.NET account.
You only have to do it once. If you've done it already, skip to the step 2.
Launch the App, then click Menu button and view device settings:


As you can see, the box will display your EmailLargeFile-compatible device ID, and one of e-mail addresses registered with the phone. Most likely, it will be the phone's Gmail account.
This Gmail account does not have to be your EmailLargeFile login account. In most cases, this is a separate e-mail address, only used for associating your device with your EmailLargeFile account record.

Next, open your EmailLargeFile account page, and enter this information exactly as it is displayed on the cell phone:


Save your account record.
Now you are ready to upload files from your Android device to EmailLargeFile.Net storage.

2. Select and Upload Files


Select pictures from a gallery, or browse to a folder and select files from the Android file system:


3. Upload Progress


Next, tap the Upload button and let our app transfer the files for you:


The progress window shows each file transfer progress, and the bottom bar shows the overall batch upload progress.
After all files have been uploaded, the success message will be displayed:


At this step you are done sending files. You may now open your EmailLargeFile.Net account to view and/or process the files as needed.

4. Mobile Uploads File Package


All files sent this way from the mobile phone are saved into the Mobile Uploads Package.


5. Upload More Files.


You may transfer more files from your phone at any time. All files coming from your phone will be saved into the Mobile Uploads file package. This is a pre-programmed package which is automatically created if needed. If you delete this package, it will be re-created next time you upload files from a mobile device.

Select and upload more files:


They all end up in the Mobile Uploads package:


6. Process Files.


Once the files made to our servers, it's now easy to move or copy them out of the Mobile Uploads package into any other file package in your account. You can copy or move each file as many times as you want, its extra copies will not use your EmailLargeFile available storage.
With EmailLargeFile.Net, you can send file packages to your e-mail recipients.


Tuesday, November 22, 2011

How to Receive Large Files via EmailLargeFile Dropbox

June 2020 Update: the pictures on this article are outdated as the Service has been completely redesigned in 2020.

Hi,
In the earlier posts, I explained how to send files with EmailLargeFile.

What if you need to receive files from your friends or clients? You can do that with EmailLargeFile Dropbox feature.

Here is how.

Step 1. Make sure all people who may send files to you are added to your EmailLargeFile address book.

Step 2. Send a link to your dropbox to your friends or clients. If you have a Website, it might be a good idea to post the link to your EmailLargeFile dropbox on your web site. Such as this:


(This is a working dropbox on our company website, see it here)

Step 3. Your clients will click on the link, and upload files via EmailLargeFile dropbox:


Step 4: You will receive their files in your DropBox package folder in your EmailLargeFile account:


In my next posts, I will explain how to set up Dropbox.


Wednesday, November 16, 2011

EMLF Pro!

Hi All,

To log in to EmailLargeFile.Net account, you don't have to type the full url (emaillargefile.net) anymore. Now you can just type emlf.pro and your browser will take you to the login page.

It's so easy! Just type emlf.pro and hit Enter.

We wanted you to save time and clicks. That's why we have registered the EMLF.Pro domain name and made it point to the EmailLargeFile.net site.

This method is also quite useful when your IT people at your office or school blocked access to Emaillargefile main website.
Just type EMLF.pro in your browser, and it will take you directly to the secure EmailLargeFile.net Login page.


Monday, November 14, 2011

How to Transfer Large Files via Internet

June 2020 Update: the pictures on this article are outdated as the Service has been completely redesigned in 2020.

Hi All!
You are probably already familiar with our free EmailLargeFile.com service. It's been around for years. Despite being simple and fast, it has its limitations. The most important one is that it can't transfer multiple files at once.

We haven't had an alternative until recently. Last month, we rolled out the brand new EmailLargeFile.NET service. There is a high chance that you haven't seen it yet, so... let me explain how to transfer large files with EmailLargeFile.Net.

First, log in.


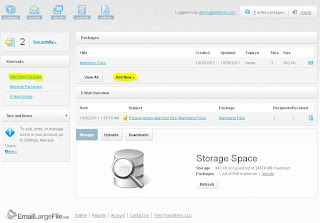
Files uploaded to EmailLargeFile.net service are combined into one or more file packages, so you have to create a package. First, click Add Package:


Give it some description, then click Next:


Now you may upload large files or photos. They will be part of the package. Don't worry about the file size, our file upload app will tell you if you are short on space. Also, don't worry about putting files in wrong packages, with our file manager you can easily copy files, or move them between packages without using extra storage space.


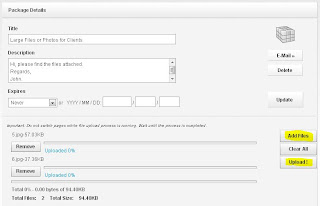
After you clicked Upload, the app will transfer copies of selected files to our servers.
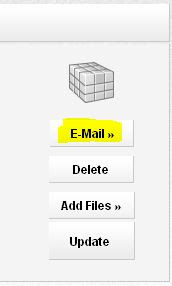
If you don't want to e-mail files to anyone, then you are Done!


If you need to e-mail your large file package to someone, read on.
Click E-Mail button to start composing a message:


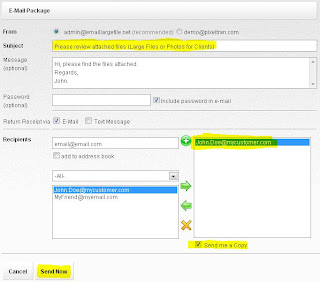
In the email compose window, you can add new e-mail addresses to the existing address books, such as Personal or Business address books. Hint: you can edit your recipients and address books from the Account screen.
After you've done adding or picking recipients, click Send Now button to let us send e-mails for you. Depending on how many addresses you entered, it may take a few minutes. You are however, done, and can observe the process from the Reports.

Your e-mail recipients will receive messages with individual file package links, such as this:


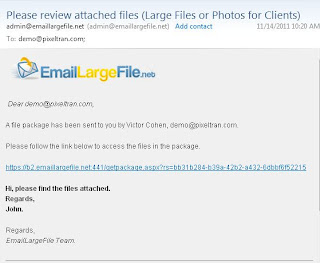
The link will take them to a page where they can view or download the files:


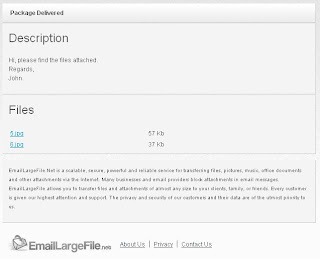
Needless to say, if you entered a Password for the e-mail, then your recipients will only be able to see the files if they entered the correct password.

Along with the SSL encryption, this feature makes EmailLargeFile.Net service one of the most secure file delivery services on the Web. Password access and encrypted communication makes it suitable for delivering medical, legal, insurance, and other important documents.

Now, back to our file management console.

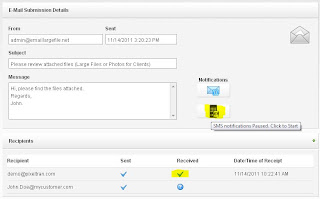
When you recipients click on the e-mail link, you will see when and where they do it.
Sometimes you can even tell if the user opened the message from his office, hotel, or airport while traveling. You can tell this by looking at the Organization name in the reports.


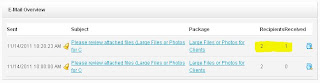
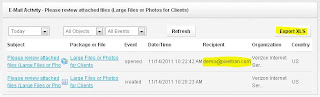
Seeing the geographical location of file activities makes EmailLargeFile service stand above its market competition. EmailLargeFile.Net service also provides you with detailed Excel compatible reports containing all data you need to know - who received or not received your files. We also tell you when and where they opened your files. If you don't see some data you need, tell us and we will create or modify the report for you. Who else would do that for you?

As a nice option, we can send you an e-mail or an SMS (text message) notification when your file package is opened. Just enter your cell phone number and provider, then turn on the notifications in the e-mail message options.


Welcome to EmailLargeFile.Net blog!

Hi All,
We are starting this blog to help all our customers to better understand how EmailLargeFile.NET service works and how it can help in their work.

We will be publishing various tips and quick how-tos with screenshots. Even if you are not a customer of EmailLargeFile, feel free to post your ideas and comments!